IDE smart prompt settings
VS Code
First, make sure you have installed
Tailwind CSS IntelliSense plug-in
Make Tailwind CSS IntelliSense recognize Tailwind CSS v4
tailwindcss-intellisense You must see @import "tailwindcss" in Tailwind CSS 4 for the workspace to be considered the Tailwind root file. In the generation mode, it is also recommended to directly write @import 'tailwindcss'; in the real entry, and then use WeappTailwindcss to output the applet target CSS.
If you still want to be decoupled from the source code, you can also use the CLI to generate an extension-only auxiliary CSS for VS Code:
- npm
- Yarn
- pnpm
- Bun
npx weapp-tailwindcss vscode-entry --css src/app.css
yarn dlx weapp-tailwindcss vscode-entry --css src/app.css
pnpm dlx weapp-tailwindcss vscode-entry --css src/app.css
bun x weapp-tailwindcss vscode-entry --css src/app.css
- The default output is at
.vscode/weapp-tailwindcss.intellisense.css, which contains@import 'tailwindcss';, the common@sourceglobs, and the CSS entries you pass in (e.g.src/app.css). - This file is only used to activate IntelliSense and does not need to and should not be referenced by the packaging process.
- If you need to customize the file name or additional
@source, you can adjust parameters such as--output,--source,--force, etc., and runnpx weapp-tailwindcss vscode-entry --helpto view all options. - If you do not want to generate a separate file, you can directly write
@import 'tailwindcss';in the real entry, and write this entrytailwindCSS.experimental.configFile.
VS Code will detect the auxiliary file after saving/reloading any file, allowing Tailwind CSS 4 projects to enjoy a complete completion, hover and jump experience.
If you want to explicitly tell Tailwind CSS IntelliSense "which source code directories a certain CSS root file corresponds to", you can continue to add tailwindCSS.experimental.configFile:
{
  "tailwindCSS.experimental.configFile": {
    ".vscode/weapp-tailwindcss.intellisense.css": "src/**"
  }
}
- The key name is the CSS entry file path used by
Tailwind CSS IntelliSense, which usually needs to contain@import "tailwindcss";. - The key value is the source code range in which this entry takes effect, and supports glob; the above configuration indicates that when you edit a file under
src/**, the extension will use.vscode/weapp-tailwindcss.intellisense.cssas the Tailwind root file. - When there are multiple Tailwind entries in a monorepo or a workspace, this writing method is more stable than "let the extension automatically guess", and is also suitable for use with the auxiliary CSS generated by
npx weapp-tailwindcss vscode-entry.
Smart prompts for wxml
We know that the best practice of tailwindcss is to be used in conjunction with the vscode/webstorm prompt plug-in.
If you encounter a situation where no smart prompt appears when writing vscode in the wxml file of class, you can refer to the following steps.
Here we take vscode as an example:
Install WXML - Language Services plug-in (just search for wxml which has the most downloads)
Then there are 2 methods, Global settings and Workspace settings, provided below. You can choose one according to your needs.
Global settings
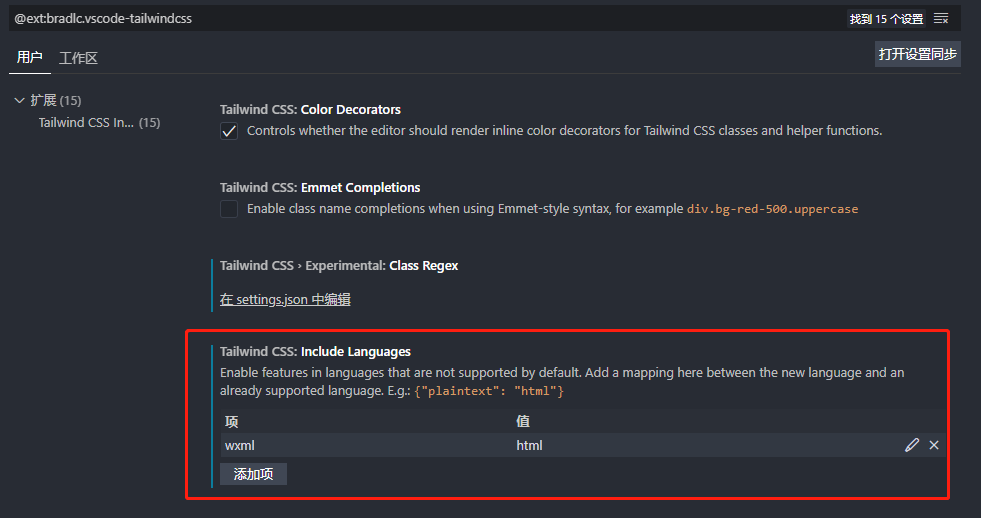
Click the settings icon in the lower left corner of vscode and search for the keyword tailwindcss to find the Tailwind CSS IntelliSense of the Extended settings plug-in
In include languages, manually mark wxml as type html
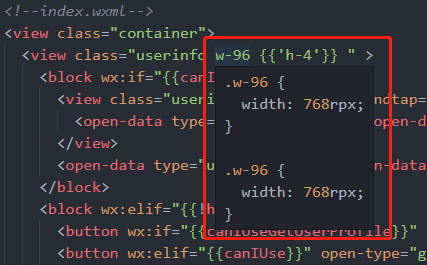
The smart prompt comes out:
Workspace settings
In the root directory of your open workspace directory, create the .vscode folder, and then add settings.json with the following content:
{
  "tailwindCSS.includeLanguages": {
    "wxml": "html"
  }
}
In this way, the vscode setting in your workspace will overwrite your global vscode setting, and the effect in the picture above can also be achieved.
Smart prompts for js, jsx, ts, tsx, vue...such files
Scene
After installing and configuring the plug-in, when we write code, we write class= and className= in those tags. In this scenario, smart prompts will appear immediately.
However, when we write js code, we often write tailwindcss string literals directly in the code, such as:
const clsName = 'bg-[#123456] text-[#654321]'

return <div className={clsName}></div>
There is no intelligent prompt when writing this kind of string. What should I do?
Solution
Here is a plug-in based solution:
- Install
clsx:
- npm
- Yarn
- pnpm
- Bun
npm i clsx
yarn add clsx
pnpm add clsx
bun add clsx
- Go to
vscodein yoursettings.jsonsettings
Add the following configuration inside:
{
  "tailwindCSS.experimental.classRegex": [
    [
      "clsx\\(([^)]*)\\)",
      "(?:'|\"|`)([^']*)(?:'|\"|`)"
    ]
  ]
}
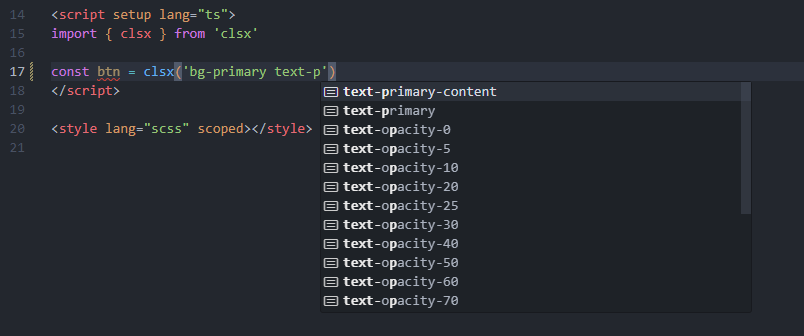
After this configuration, the smart prompt will appear:
There is a problem
This principle also relies on regular matching, that is, Tailwind CSS IntelliSense plug-in matches the text field of the current vscode activity, and the keyword clsx() method exists, so the smart prompt is injected into it.
So it won't work if you write it like this:
import { clsx as AAA } from 'clsx'

const btn = AAA('')
In addition, you can modify/add the regular rules in "tailwindCSS.experimental.classRegex" based on this feature, and then encapsulate a method yourself for intelligent prompting of tailwindcss.
WebStorm
Similar to
vscode, also useclsxfunction
-
Make sure your version is greater than or equal to WebStorm 2023.1
-
Open settings and go to Languages and Frameworks | Style Sheets | Tailwind CSS
-
Add the following configuration:
{
  "experimental": {
    "classRegex": ["clsx\\(([^)]*)\\)", "[\"'`]([^\"'`]*).*?[\"'`]"]
  }
}
If you use the
class-variance-authorityfunction ofcva, just add the"cva\\(([^)]*)\\)"regular expression.
HbuilderX
<PROTECTED_0>